I won’t claim to be an expert on color theory or coloring of fibers. I’ve not done much dyeing, other than turning my old Converse Sneakers bright pink and wearable once more, and reviving the odd pair of pants that had lost my interest in whatever shade they were orginally made.
My experience with color comes from my gut. Certain colors feel a certain way together and can create a certain mood. They say that hot blooded Aries people (of which I am one) are drawn to hot red shades, and my house certainly has probably more than it’s fair share of the color. But, I don’t go for Fire Red, I go for Brick, for faded Raspberry, for Terra Cotta. Those colors have more to say to me than a straight bold primary or secondary shade. Then I’ve thrown in smatterings of coffee, black, mustard and navajo white, along with a few other bits and pieces for balance, breathing room and good measure.
When I work on a new design, I’m pushed in one way or another sometimes by color, sometimes by fiber and texture, and often both combined. Rarely if ever do I start out by saying “I’m going to make a ………….. (fill in the blank).” I will go to the studio and stare at my shelves of yarn, piled in crooked boxes or stacked in cones, I start pulling out one yarn and another, and shortly have a sea of color on my studio table. It’s that sea of color that determines what it will become, some colors just “look” more like a scarf or a hat, and yet others a purse or mittens.
 Now I’m not out buying yarn on a daily basis; I have worked with the mostly the same shades for the last few years, adding in a few new ones each season, though rarely abandoning the older. When adding in the new shades and hues, I’m seeing whole new relationships and balancing acts appear – bringing life once more to older colors in which I had previously lost interest.
This brings me to my latest project. I have fallen in love with the Louet Gems color palette. The driving force behind these beautiful colors is Trudy Van Stralen, the founder of the company. I have been working with Louet Gems yarn for a short while (it’s the newest addition to the quality yarns I use in the Knitwhits kits), using it solely as a sock yarn for my adult sock kits and my Socks For Tots range. But the palette as a whole tells a story that can’t be told (easily) in smaller items such as these socks. I felt that the palette deserved a bigger stage. Enter “Amelie” the floral crochet throw. This design requires that each motif be made up of 3 colors, 2 of the same hue, but one light, one dark, and a third, preferably unrelated color as the border and contrast. . The Louet colors have a dustyness that I think appeals to the old-fashioned style of this type of design, and a large multicolored throw is the perfect vehicle to show off a good portion of the 36 available shades.
Within the range of available shades are a few primary colors, though the majority of shades are a few steps away. For example, there is a Neptune blue, which is like a light sky, but there is also Aqua. It’s the Aqua that will work here. There is an Indigo, and also a Navy, for this throw it’s the Indigo that will fit, being so dark that it’s almost black.
 As I go through these colors there are a few that just don’t quite fit in, for my purposes at least. And yet, given the size of this project – my goal is to make a Queen size coverlet – the more colors I will have to pick from the better.
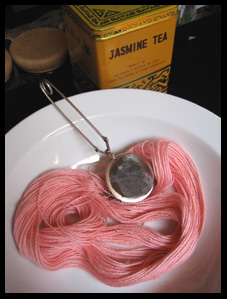
Since my chosen palette is leaning to an aged, softened look, the simplest way to increase my color range is to work with some of the remaining colors (that would clash too much as they are) and tone them down. I have selected a coral, a forest green and a cherry red to start. Here I will show you the coral. As it is, it’s too intense for my purposes and will visually stand out from the rest and create discord and unbalance. A simple and quick way to age a color is to …. make a cup of tea!
I’ve started here with a loose hank of yarn, (I would recommend starting with a small swatch so you can make a mistake or two before finding your perfect shade), which I’ve placed it in a shallow bowl. In the tea strainer is some Jasmine Tea. No reason for that paricular one, other than I know it contains black tea, it smells good and I have lots of it.  It also happens to be quite weak, so I can’t mess it up too quickly. I will add hot water (this is option 1 – depending on your yarn type, option 2 may be the better choice) and let it steep. What I would suggest is keeping a clip of the yarn nearby so you can compare the colors. The longer your yarn will steep, the greater the change in color. Also keep in mind, if you are starting with a lighter shade as I have done here, that it will take the color quicker, or rather, the tea will have a greater effect, more rapidly. Option 2 is to make the tea first in a separate container, let it cool and then soak your yarn. In order to ensure even absorption of the color, be sure the yarn has room to move, and that it is presoaked and wet before placing it in the brew.
I would check the yarn fairly quickly, even within a couple of minutes if all you are seeking is a slight change of hue. However if you have a dark color to begin with, you will want to leave it for longer to see any changes.
 Here you can see my Coral color has become a pale salmon. Now this change was fairly rapid, occuring within about 5 minutes in the hot water. Given that the color change is coming from tea, you are effectively staining your yarn, so be careful as if you go too far, you may end up with a result you don’t like. As with knitting itself, this is where a test or swatch will really come in handy and save you a headache later on. Remember, you can always make it darker, but it will be harder to remove the color, so caution is the key.
As for my Forest Green and Cherry Red? The changes were very subtle after a good hour in the tea – I did gradutate to straight up English Breakfast tea in the end for the darker shades, from which I now have a lovely deep leaf green and a rich roasted Red, just the right intensity and hue for my giant project.
(If you are interested in purchasing a copy of the pattern for Amelie, let me know, if there is enough interest I will add it to the Knitwhits site early, I have also included in the pattern information on selecting yarns, determining yarn quantities, color placement and of course instructions for the stitch motif itself)


 I’ve just posted
  So there it is, the cable sweater you have to have. But oh! all those cables.. Working cables is one of the most satisfying techniques in knitting, but if you have a lot of cables in one panel it can be also be repetitive, and not in the knitting and purling repetitive way that we all love so much about knitting. A simple way to relieve the annoyance of constantly picking up and putting down that cable needle is just to work without one! You do this by (heavens!) dropping your stitches, replacing them on the needle in the crossed position and then working them in either knits or purls as called for in your instructions.
 Step 1: Drop the stitches. Some prefer not to do this, in which case you could work into the back of the purl stitch, then bring your yarn to the front to work the knits. Personally, I find this method a bit cumbersome and sometimes confusing if you are working a variety of cables in multiple directions. As I show you here, you can also just drop all the relevant stitches off your left needle. What I need to do now, is bring the purl stitch to the back of the knits, back on to my left needle, so that I can first work into the cabled knit stitches.
 Step 2: Picking them back up again. I certainly don’t want to lose my 3 little stitches here, and the sequence in which I pick them up will either make my life easier or harder. For this cable, I have found is that it works best to pick up the stitches closest to the left needle first, in this case, the two cable knit stitches. I bring forward my right needle and catch those two stitches, then I can reach down with the left needle to re-catch the purl stitch. Next, I will slide the 2 knit cable sts also back onto the left needle, which will put them ahead of the purl stitch, and in the correct position to be worked.
 Step 3: Working the cable. Here the stitches are in the correct sequence, with the knit stitches crossing over the purl stitch, and I am now able to knit the first of the two knit cable stitches. (BTW – though it appears as though I’m knitting into the back of my stitch here, that is not necessary. In all likelyhood, I had accidentally twisted the stitch when I picked it up, so rather than re-dropping it, I just went ahead and knitted into the back of the stitch.)
 Step 2: Picking them back up again . To do this, I will bring my right needle forward and catch the two loose sts. The next step would be to slide these front stitches back onto the left needle, putting them in the correct place in front of the other cable. They will then be ready to knit.
 Step 3: Working the cable. In this image, you can see that I have knitted the first two stitches and will now knit the next two, competing this front cross.
 Let’s start with what a manufacturer suggests..theoretically, the figures provided for you on a yarn label are what the yarn distributor or manufacturer has determined based on what they perceive to be the “average” knitter. But here’s the rub.. the yarn shown in the picture to the left is distributed by two different companies. Company A says the yarn knits up at 5 sts/1″ on 4mm needles. Company B says the yarn knits up at 5 1/2 sts/1″ on 4mm needles. At least they agree on what needles should be used!
 Next was Sue, she worked up the sample at 11.5 sts and 15 rows, so hers was a smidgeon tighter all around.

 Let me start by saying there is no right or wrong way to knit, however you do, theoretically, want your stitches to look even and pretty, and you probably want knitting to be fairly easy, smooth and quick.
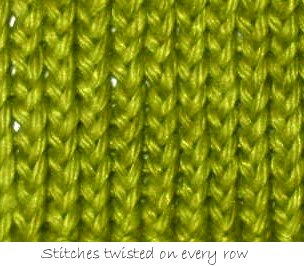 Here is an example of stitches that are twisted on every row. To create this, on my right side (knit) rows, I picked up my knit stitches through the front part of the loop and wrapped my yarn clockwise to creat the Knit stitch. With my purl stitches, I picked up again through the front of the loop and wrapped the yarn under my needle and over, also clockwise.
 A lot of knitters, when just learning, will have twisted sts on just one row and untwisted on the following. They are still figuring out what goes where, and are feeling all thumbs, wishing they had a third arm to hold anything as it’s all so confusing.


